
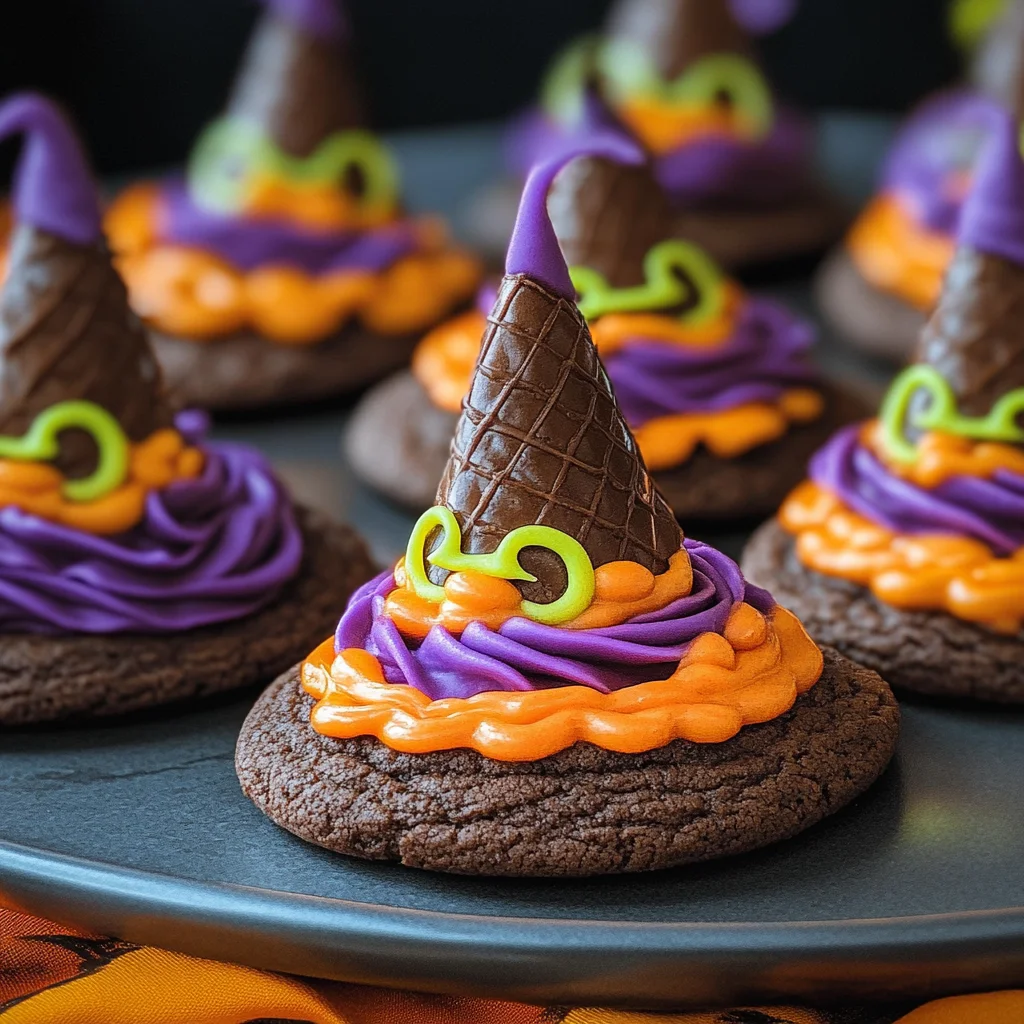
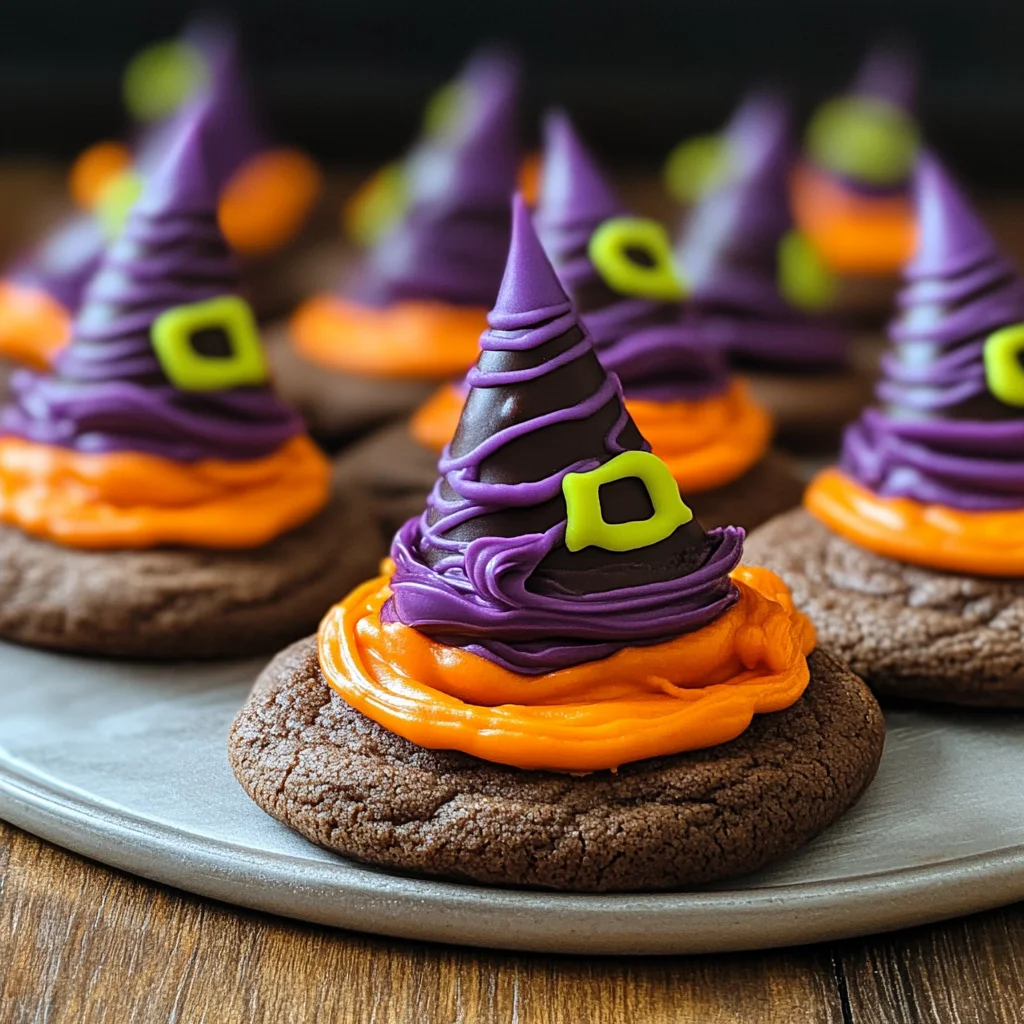
Halloween Witch Hat Cookies
These Halloween Witch Hat Cookies are the perfect treat to bring a spooky delight to your Halloween festivities. With their fun design and chocolaty flavor, these cookies are ideal for parties or family gatherings. Not only are they easy to make, but they also provide a creative outlet for kids as they customize their own witch hats. Get ready to impress your guests with these whimsical and delicious treats!
Why You’ll Love This Recipe
- Fun for All Ages: Making these cookies is a great activity for kids and adults alike, ensuring everyone has a blast in the kitchen.
- Customizable Designs: You can easily change the colors and decorations to suit your Halloween theme or personal taste.
- Decadent Flavor: The combination of chocolate cookies with sweet icing creates a delightful taste that will satisfy any sweet tooth.
- Perfect for Parties: These cookies not only look amazing but also make great conversation starters at any Halloween gathering.
- Quick Assembly: With simple steps and readily available ingredients, these cookies can be prepared in no time.
Tools and Preparation
Before diving into this fun Halloween project, gather your tools. Having everything on hand will make the process smooth and enjoyable.
Essential Tools and Equipment
- Baking sheet
- Cupcake cones baking rack
- Parchment paper
- Decorating bags
- Spatula
- Knife
Importance of Each Tool
- Baking sheet: Essential for even baking of your cookie bases, ensuring they come out perfectly every time.
- Cupcake cones baking rack: Holds the sugar cones upright while baking, preventing spills and ensuring even cooking.
- Decorating bags: Allows you to pipe icing easily and precisely onto your witch hats, helping create those fun designs.
Ingredients
To create these delightful Halloween Witch Hat Cookies, gather the following ingredients:
For the Cookie Base
- Favorite Cake Mix or Try Wilton’s Chocolate Cake Recipe
- Store Bought Chocolate Cookies or Try This Recipe from Wilton
For the Icing
- Lemon Yellow Icing Color
- Black Color Mist Food Coloring Spray
- Rose Icing Colors Pink Food Coloring
- Violet Icing Color, Gel Food Coloring
- Golden Yellow Icing Color
- Orange Icing Color
For Assembly
- Sugar Cones
- Creamy White Decorator Icing, 4 lb. Tub
How to Make Halloween Witch Hat Cookies
Step 1: Prepare & Bake the Cones
- Prepare the cake mix according to your chosen recipe’s instructions.
- Place the cupcake cones baking rack on a baking sheet.
- Insert sugar cones into the rack and fill them with 2 tablespoons of cake batter.
- Bake and cool the cones according to your recipe’s timing instructions.
Step 2: Spray the Cones
- If needed, trim any risen cake from the tops of the cones using a knife.
- Place cones wide side down on parchment paper.
- Using Black Color Mist, spray each cone black and let them dry for about 10 to 15 minutes.
Step 3: Tint the Icing & Prepare the Bags
- Tint 1 cup of creamy white decorator icing orange.
- Combine violet and rose icing colors to create another cup of purple icing.
- Prepare two decorating bags with tip 2B filled with orange and purple icings separately.
- Tint ¼ cup of creamy white decorator icing yellow using golden yellow and lemon yellow colors; place it in a bag with tip 3 attached.
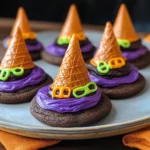
Step 4: Assemble the Witch Hats
- Pipe a small amount of orange icing in the center of each cookie before placing a cone on top.
- With tip facing out, pipe a band around half of the cones using orange icing; smooth it with a spatula.
- Repeat this process with purple icing on the remaining cookies and cones.
- Allow them to set for about 15 to 20 minutes; then use yellow icing with tip 3 to pipe buckles around each hat band.
- Let them set again for another 15 to 20 minutes before enjoying!
How to Serve Halloween Witch Hat Cookies
Serving Halloween Witch Hat Cookies can be as delightful as making them. These cookies are not only visually appealing but also versatile for different occasions. Here are some fun ways to serve them at your Halloween gatherings.
Individual Treat Bags
- Create spooky treat bags using clear plastic bags filled with a couple of cookies. Tie them with orange or purple ribbons for a festive touch.
Halloween Dessert Table
- Arrange the cookies on a themed dessert table alongside other treats like cupcakes, candy corn, and spooky-themed snacks for an eye-catching display.
Party Favors
- Send guests home with cookies in festive boxes or tins. Personalize each box with a thank-you note to add a special touch.
Cookie Decorating Station
- Set up a cookie decorating station where guests can personalize their witch hats with extra icing and toppings. This interactive element adds fun to your gathering.
Themed Platter
- Serve the cookies on a platter decorated with spider webs and plastic spiders for an eerie vibe that matches your Halloween theme.
How to Perfect Halloween Witch Hat Cookies
To make sure your Halloween Witch Hat Cookies turn out perfectly, follow these helpful tips.
- Use Quality Ingredients: Choose high-quality cake mix and chocolate cookies for the best flavor and texture.
- Chill the Icing: If your icing becomes too soft while working, chill it briefly in the refrigerator to help maintain its structure when decorating.
- Pipe with Care: When piping icing onto the cones, practice steady pressure for an even distribution, ensuring a professional-looking finish.
- Let Them Set: Allow adequate time for the icing to set between steps so that colors don’t bleed into one another.
- Experiment with Colors: Feel free to mix different shades of food coloring to create unique designs that stand out at your party.
- Store Properly: Keep leftover cookies in an airtight container at room temperature to maintain freshness and texture.
Best Side Dishes for Halloween Witch Hat Cookies
Pairing side dishes with your Halloween Witch Hat Cookies can enhance your dessert spread. Here are some delicious ideas that complement these sweet treats well.
- Pumpkin Soup: A warm and creamy soup that adds seasonal flavors, perfect for cooling autumn evenings.
- Roasted Vegetables: A medley of seasonal vegetables like carrots, squash, and Brussels sprouts tossed in olive oil and herbs enhances any menu.
- Spooky Salad: A vibrant salad featuring dark greens, cranberries, and pumpkin seeds drizzled with a tangy vinaigrette makes for a healthy choice.
- Cheesy Garlic Breadsticks: Soft breadsticks topped with garlic butter and cheese provide a savory snack option alongside sweet cookies.
- Witch’s Brew Punch: A fun non-alcoholic punch made from fruit juices and soda served in a cauldron-style bowl adds festive flair.
- Crispy Apple Nachos: Sliced apples drizzled with caramel sauce and topped with nuts create a fresh yet indulgent treat that pairs well with cookies.
- Stuffed Mini Peppers: Colorful mini peppers stuffed with cream cheese or hummus offer a crunchy contrast to sweet desserts.
- Baked Potato Skins: Crispy potato skins topped with cheese, green onions, and sour cream provide hearty bites that balance sweets on your table.
Common Mistakes to Avoid
When making Halloween Witch Hat Cookies, it’s easy to make a few common mistakes. Here are some tips to help you avoid them.
- Boldly spray the cones: Not allowing the black mist to dry properly can lead to smudged colors. Always let the cones dry for 10-15 minutes after spraying.
- Ignoring icing consistency: If your icing is too runny, it won’t hold its shape. Aim for a thick yet pipeable consistency by adjusting with powdered sugar as needed.
- Rushing the assembly: Assembling the cookies too quickly can cause structural issues. Allow each layer of icing to set for 15-20 minutes before adding more.
- Overfilling the cones: Filling the sugar cones too much can lead to overflow while baking. Stick to 2 tablespoons of batter per cone for the best results.
- Not customizing flavors: Sticking strictly to chocolate can be limiting. Feel free to experiment with different cake mixes or flavors for a unique twist.
Storage & Reheating Instructions
Refrigerator Storage
- Store leftover cookies in an airtight container for up to 5 days.
- Place parchment paper between layers if stacking to prevent sticking.
Freezing Halloween Witch Hat Cookies
- Freeze cookies individually on a baking sheet until solid, then transfer them to a freezer-safe bag for up to 3 months.
- Thaw in the refrigerator overnight before serving.
Reheating Halloween Witch Hat Cookies
- Oven: Preheat your oven to 350°F (175°C) and bake for about 5-7 minutes until warmed through.
- Microwave: Heat one cookie at a time on medium power for about 10-15 seconds.
- Stovetop: Use a non-stick pan over low heat, flipping occasionally until warmed.
Frequently Asked Questions
Here are some commonly asked questions about Halloween Witch Hat Cookies.
What are Halloween Witch Hat Cookies?
Halloween Witch Hat Cookies are fun, festive treats made with cake mix, cookies, and decorated to look like witch hats. They’re perfect for Halloween parties!
How long does it take to make Halloween Witch Hat Cookies?
The total time required is approximately 1 hour and 45 minutes, including prep and cooling time.
Can I customize the colors of my Halloween Witch Hat Cookies?
Absolutely! You can use any food coloring you like to create unique designs that match your Halloween theme.
Are there alternatives if I don’t have sugar cones?
You can use mini ice cream cones or even chocolate-dipped pretzel sticks as alternatives for creating witch hats.
How should I store leftover Halloween Witch Hat Cookies?
Store them in an airtight container in the refrigerator for up to 5 days or freeze them for longer storage.
Final Thoughts
These Halloween Witch Hat Cookies are not only visually stunning but also versatile in flavors and decorations. Perfect for kids and adults alike, they allow you to get creative with colors and designs. Give this recipe a try and delight your guests with these spooky treats!
Halloween Witch Hat Cookies
- Total Time: 50 minutes
- Yield: Approximately 12 servings
Description
Get ready to enchant your Halloween celebrations with these delightful Halloween Witch Hat Cookies! These whimsical treats are not only visually striking but also incredibly fun to make. Perfect for kids and adults alike, they allow for creative expression as everyone can customize their own witch hats. Made with a chocolatey cookie base and adorned with vibrant icing, these cookies are sure to be the highlight of any gathering. Whether you’re hosting a spooky party or looking for a festive activity, these witch hat cookies will cast a spell on your guests!
Ingredients
- Chocolate cake mix
- Sugar cones
- Creamy white decorator icing
- Food coloring (orange, black, violet, rose, golden yellow)
- Chocolate cookies
Instructions
- Preheat your oven according to the cake mix instructions. Prepare the cake batter and fill sugar cones with 2 tablespoons of the batter.
- Bake the filled cones until cooked through and let cool.
- Spray the cooled cones with black color mist and let dry.
- Tint icing in various colors (orange, purple, yellow) and pipe decorations onto each cone.
- Assemble by attaching the decorated cones to chocolate cookies using icing.
- Prep Time: 30 minutes
- Cook Time: 20 minutes
- Category: Dessert
- Method: Baking
- Cuisine: American
Nutrition
- Serving Size: 1 cookie (50g)
- Calories: 210
- Sugar: 18g
- Sodium: 150mg
- Fat: 8g
- Saturated Fat: 3g
- Unsaturated Fat: 4g
- Trans Fat: 0g
- Carbohydrates: 34g
- Fiber: 1g
- Protein: 2g
- Cholesterol: 5mg
Keywords: Experiment with different cake mixes for unique flavors. Allow icing to set between steps to avoid color bleeding. Get creative with additional edible decorations like sprinkles.